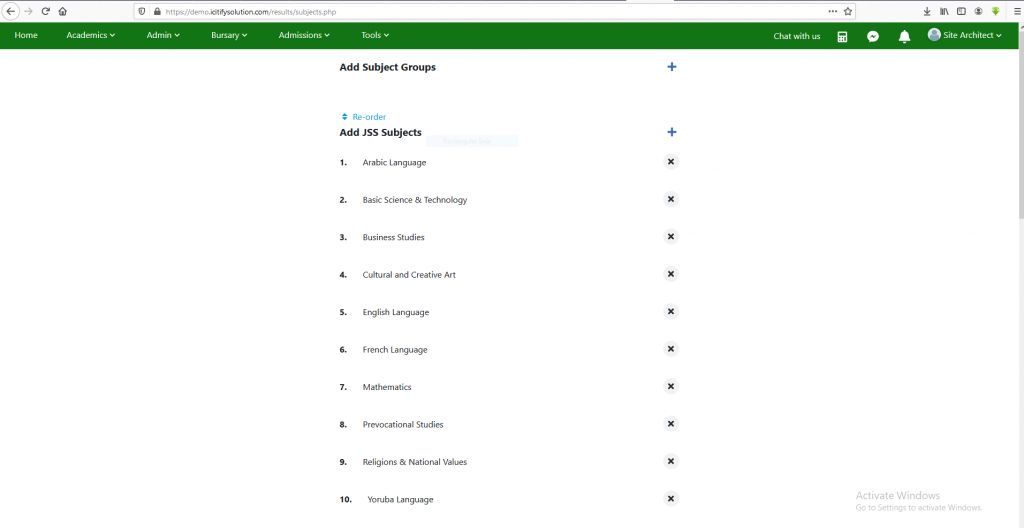
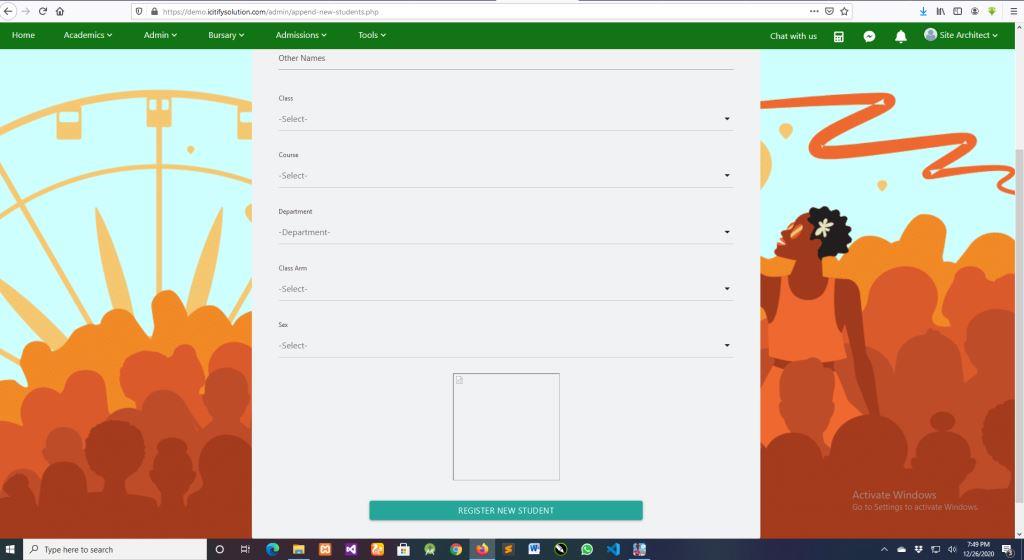
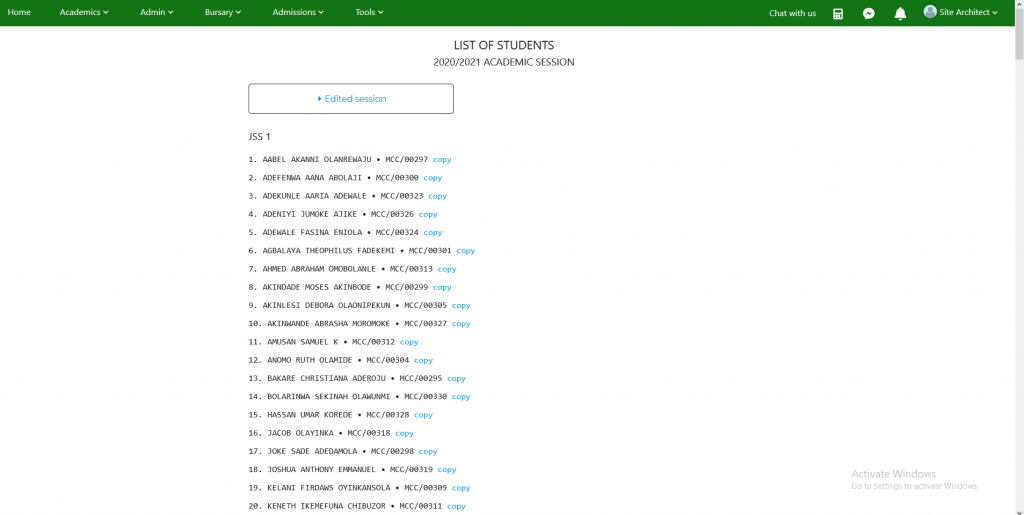
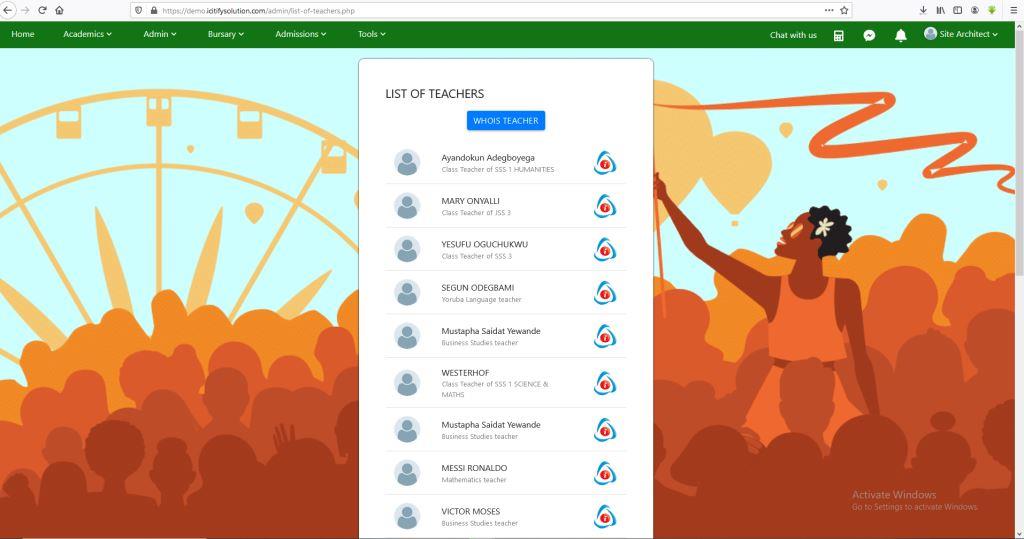
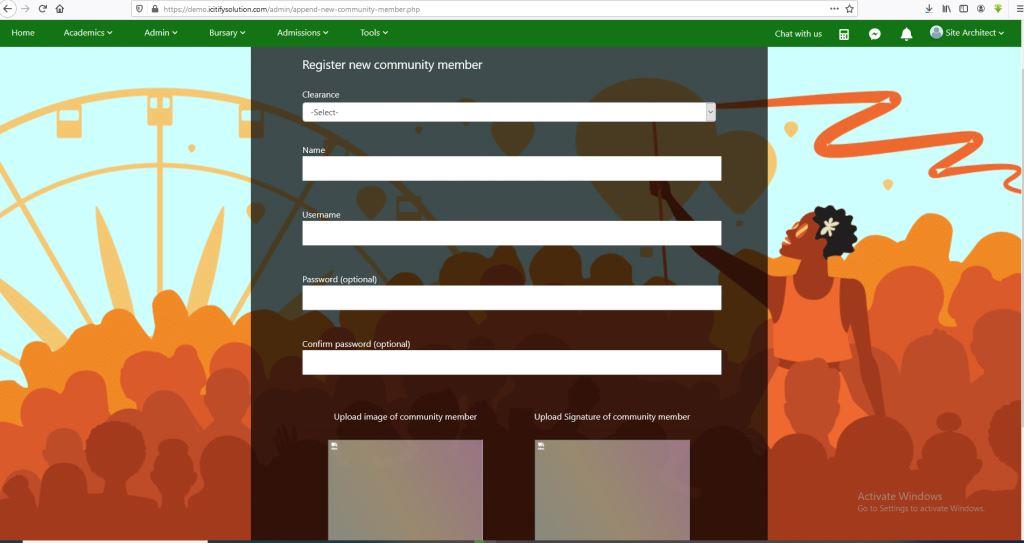
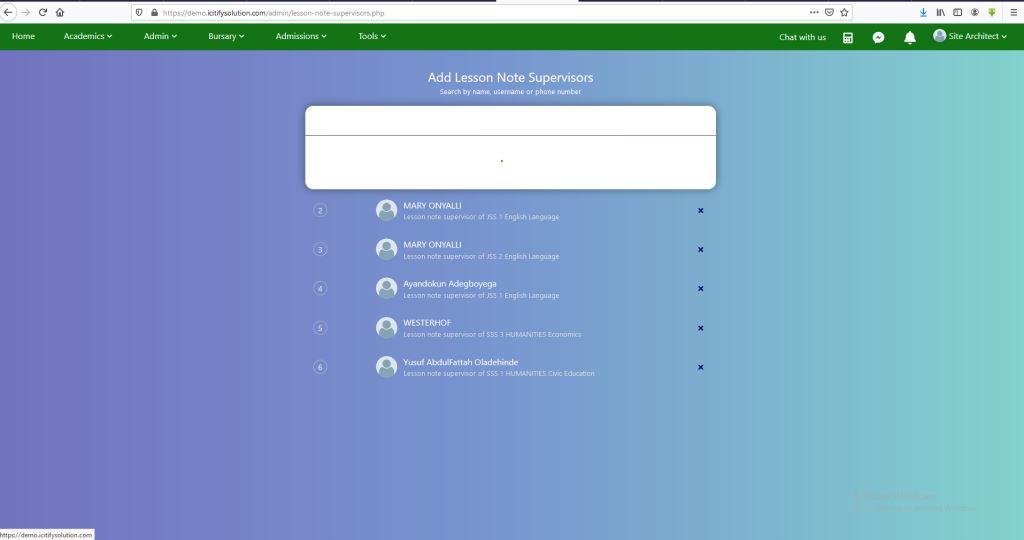
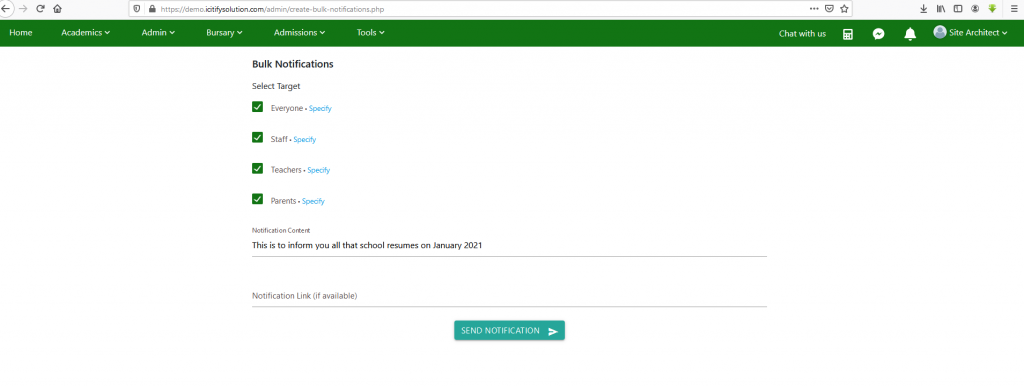
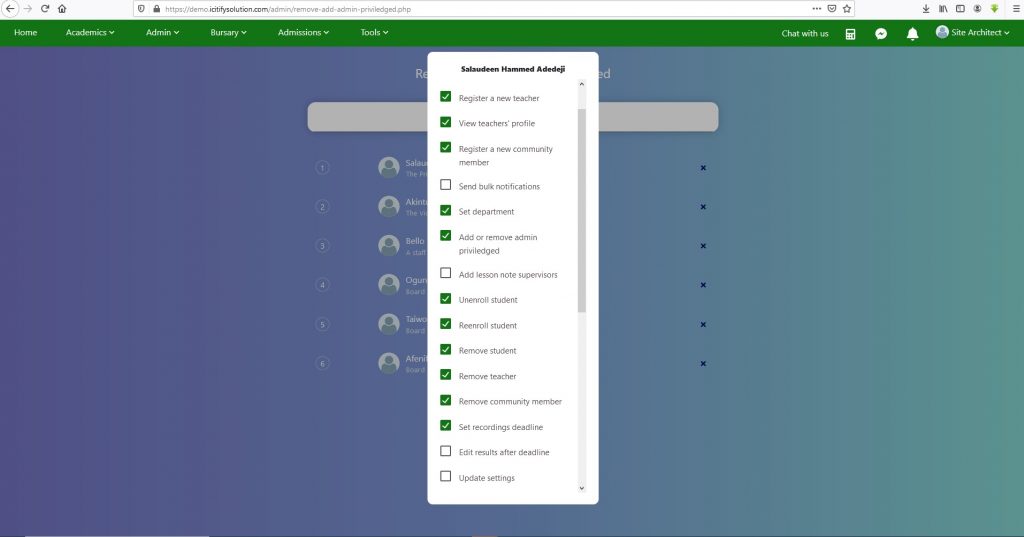
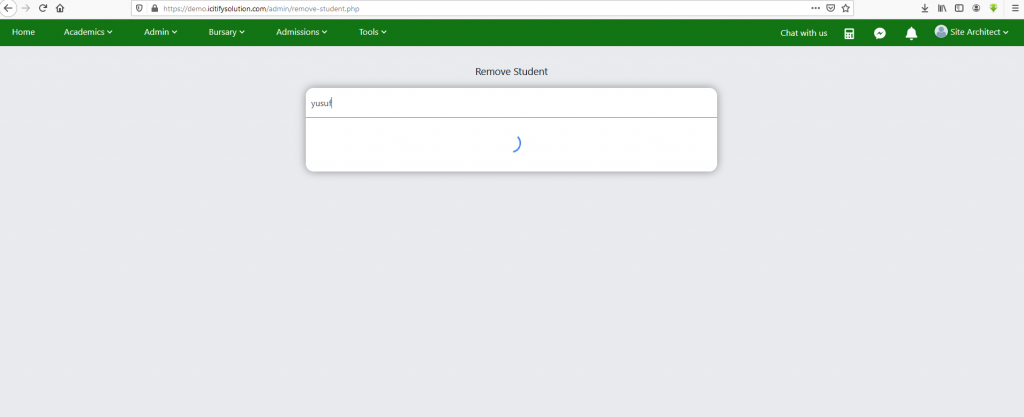
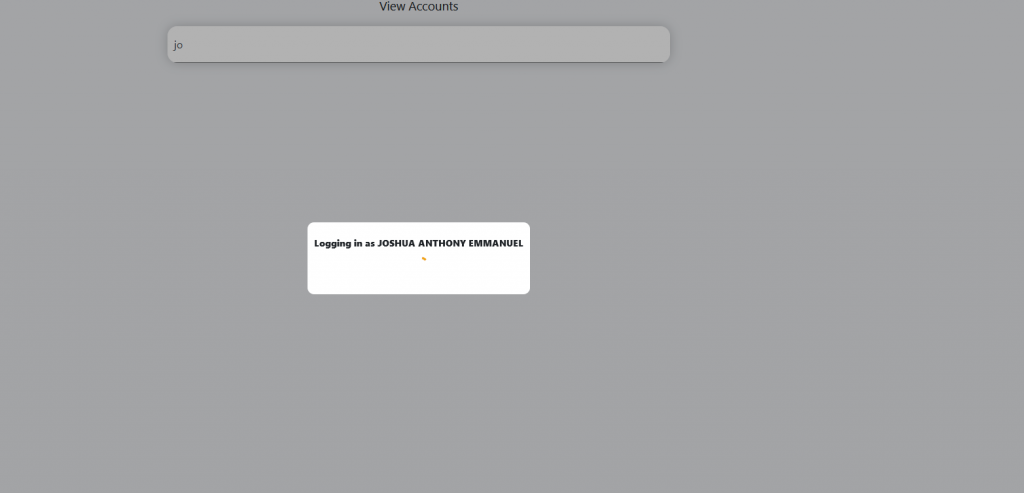
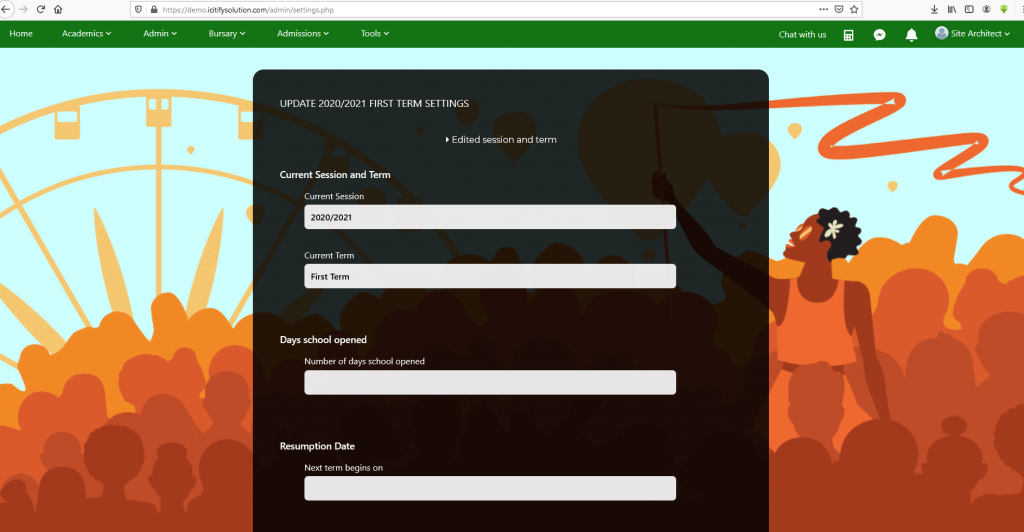
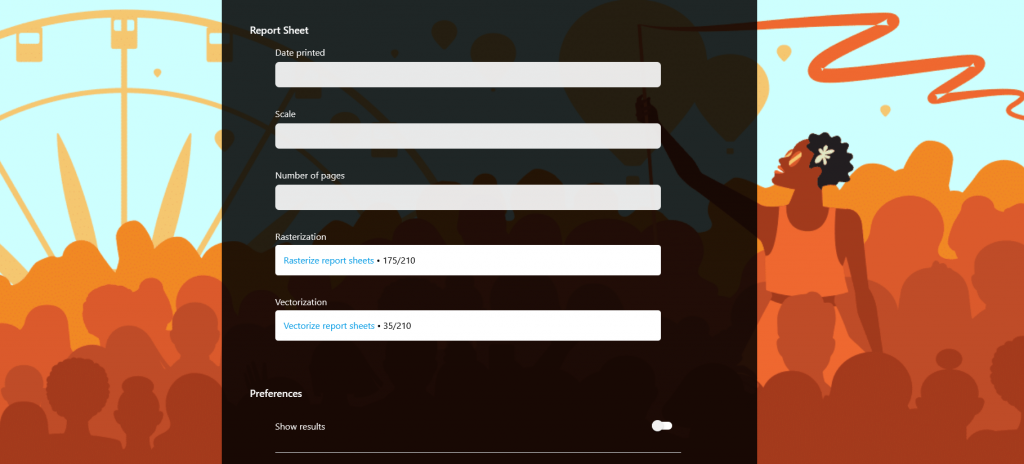
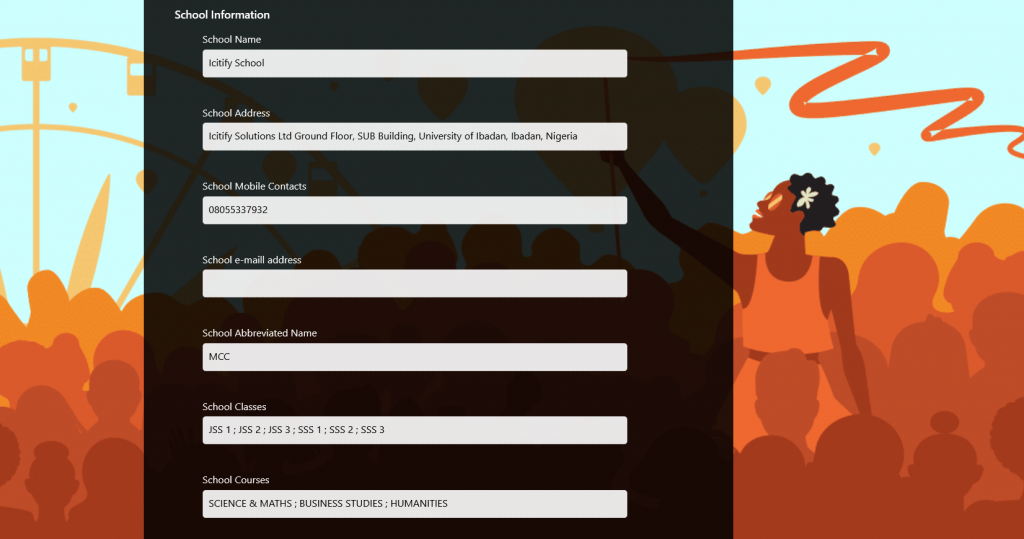
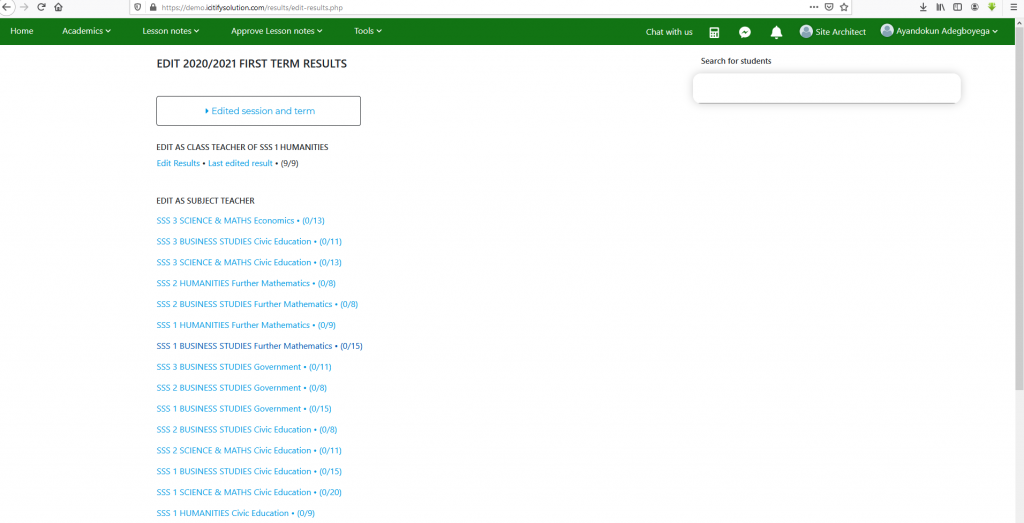
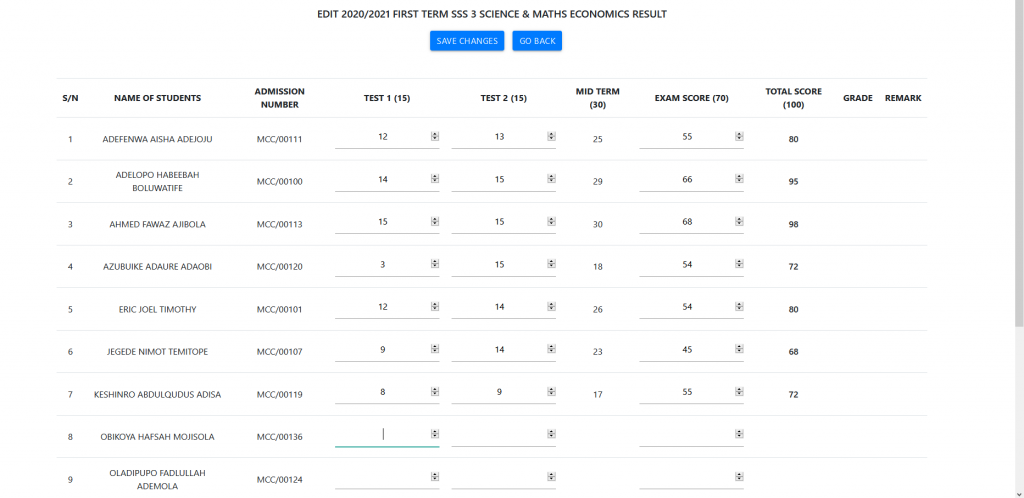
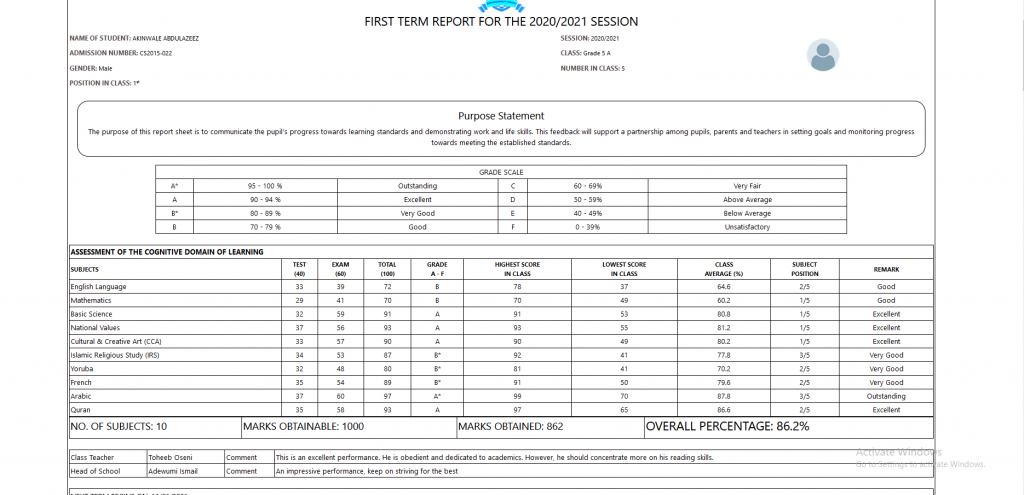
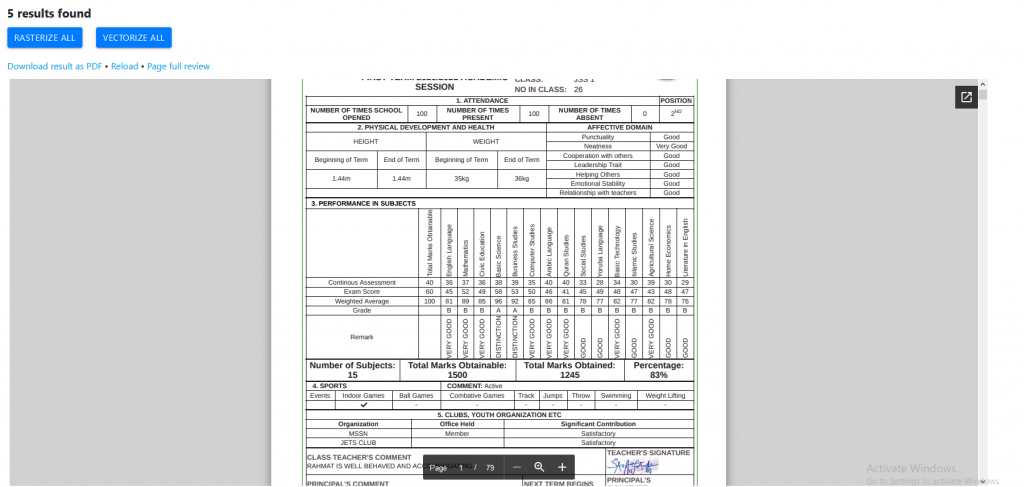
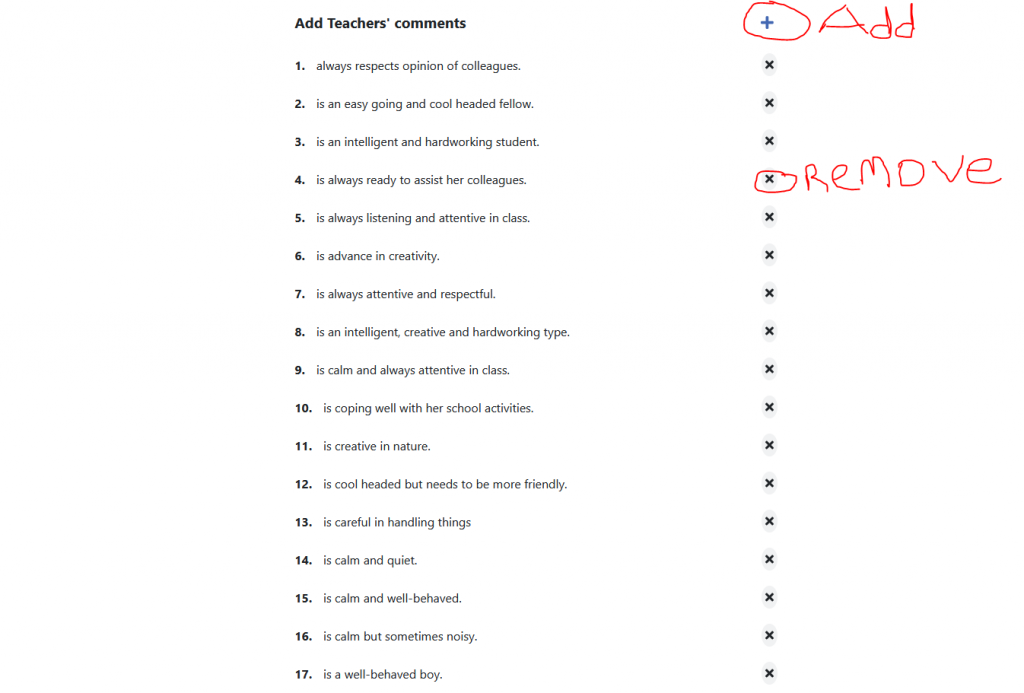
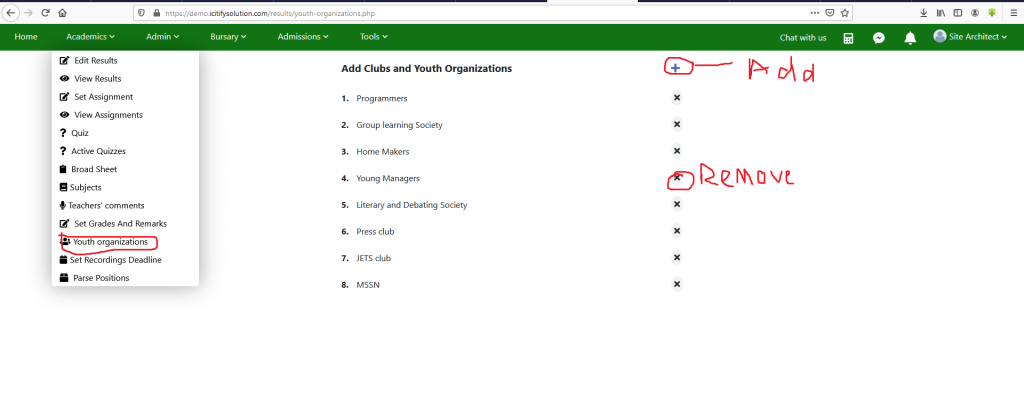
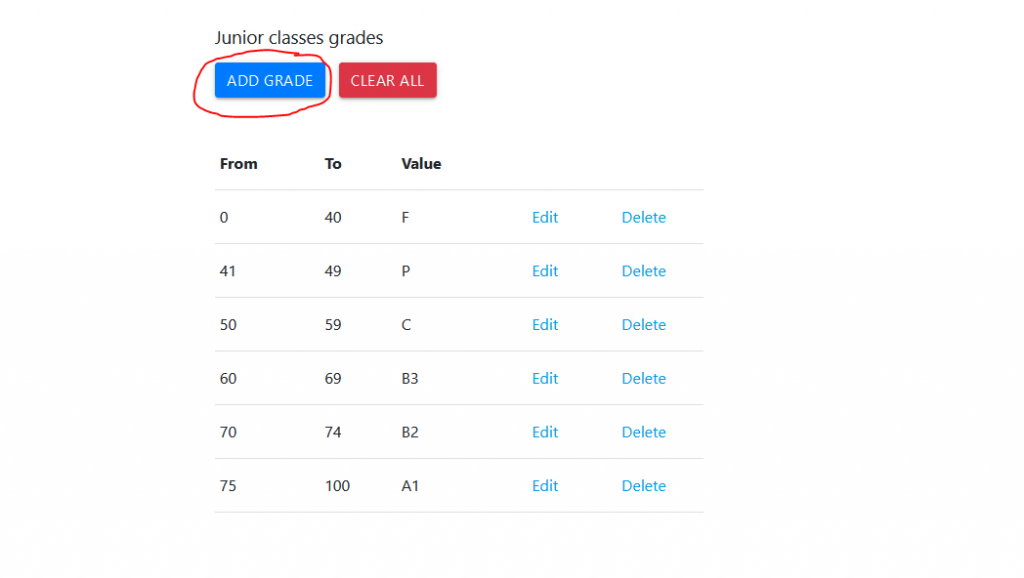
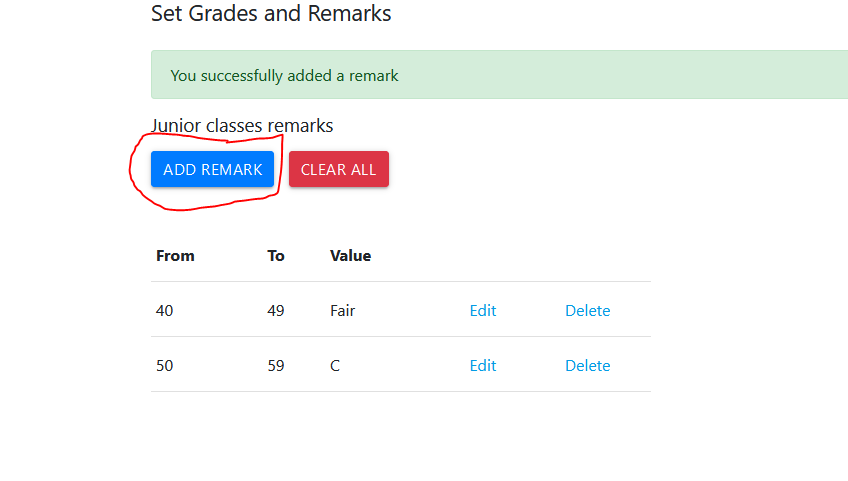
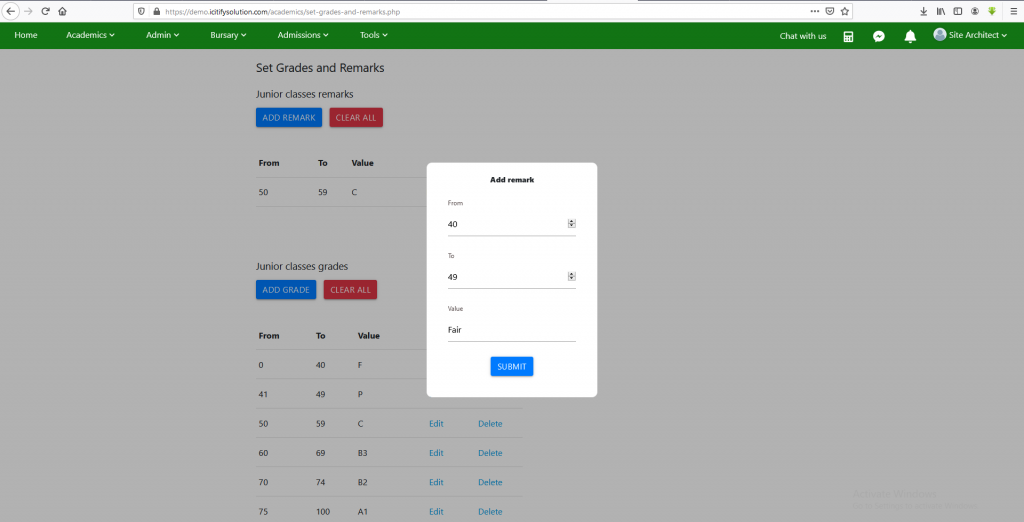
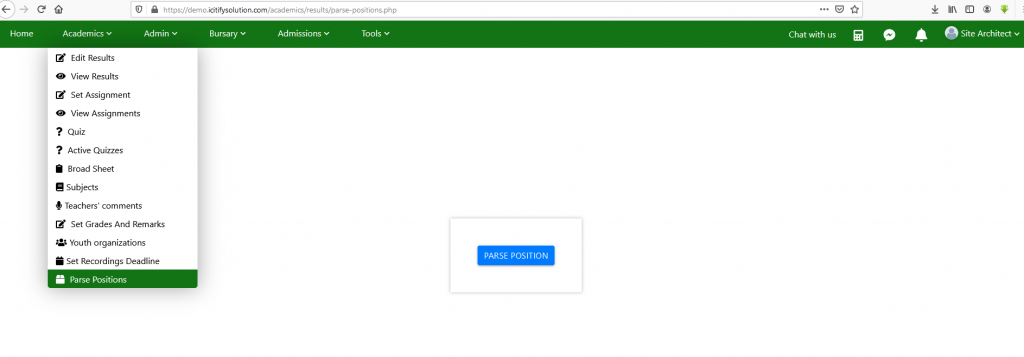
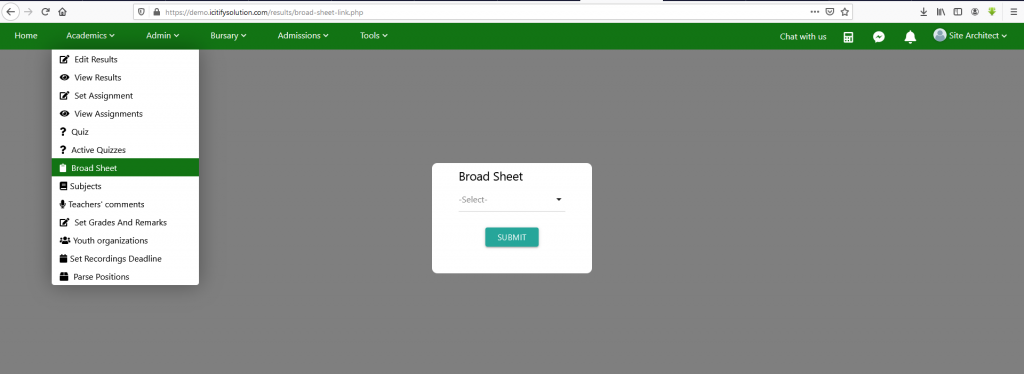
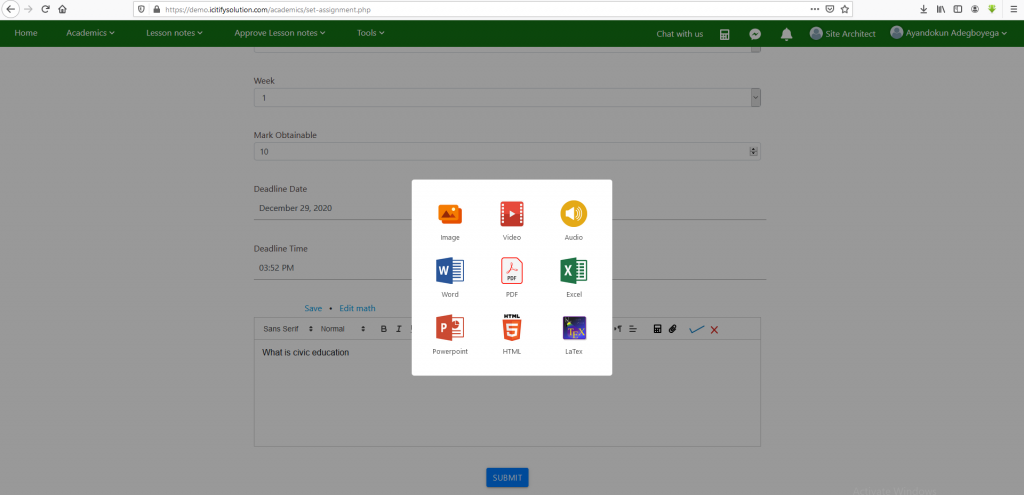
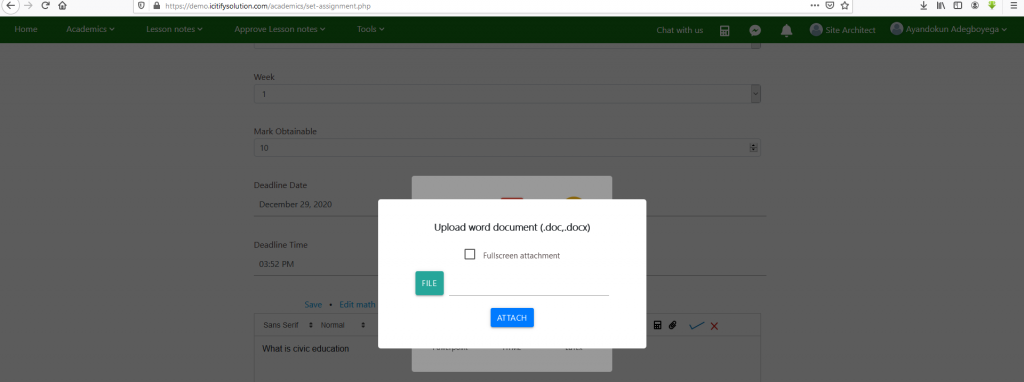
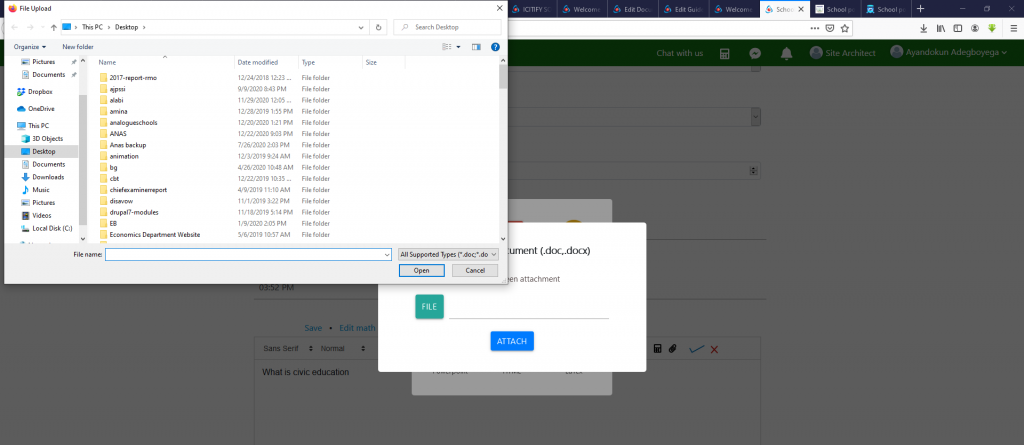
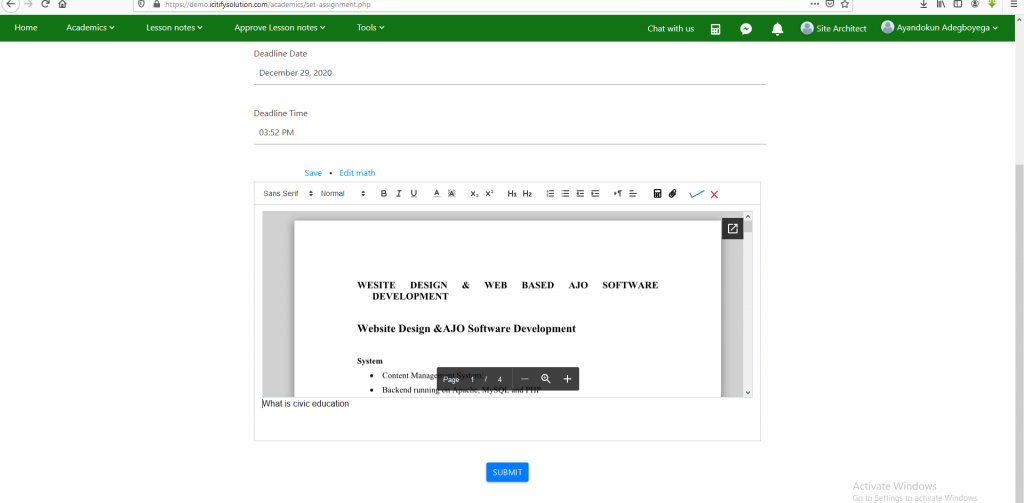
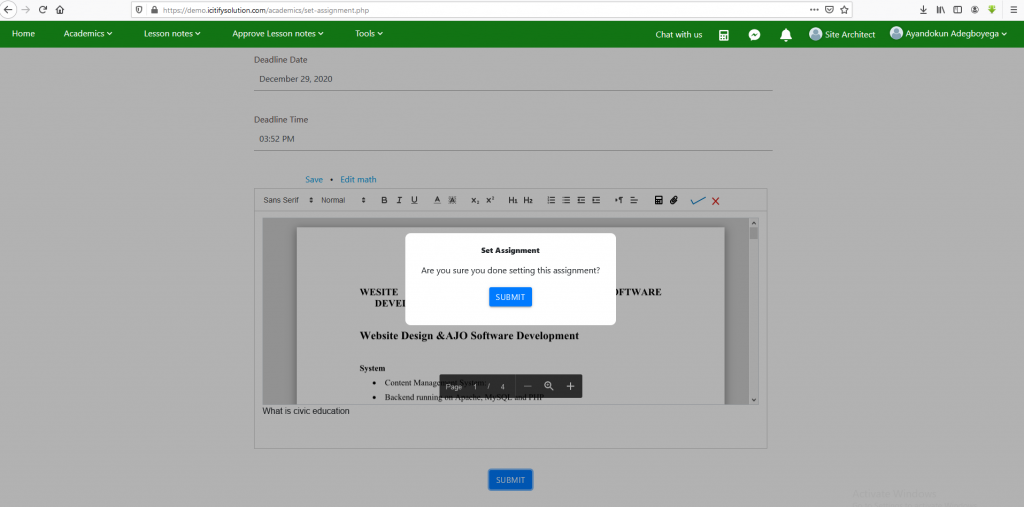
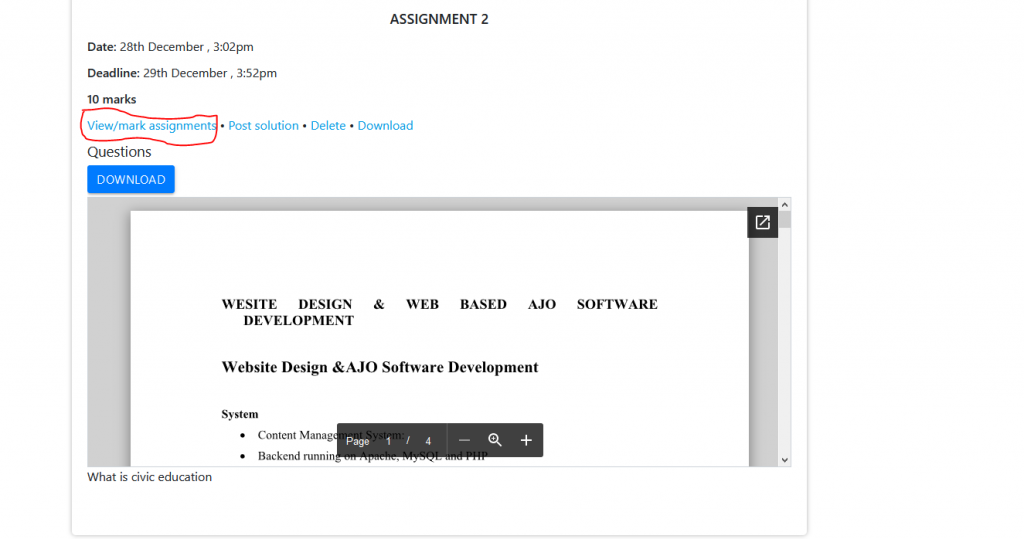
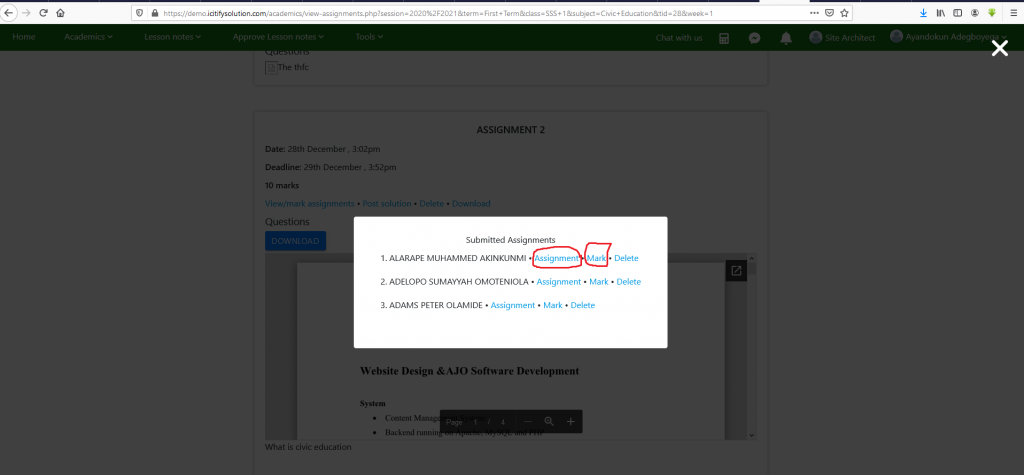
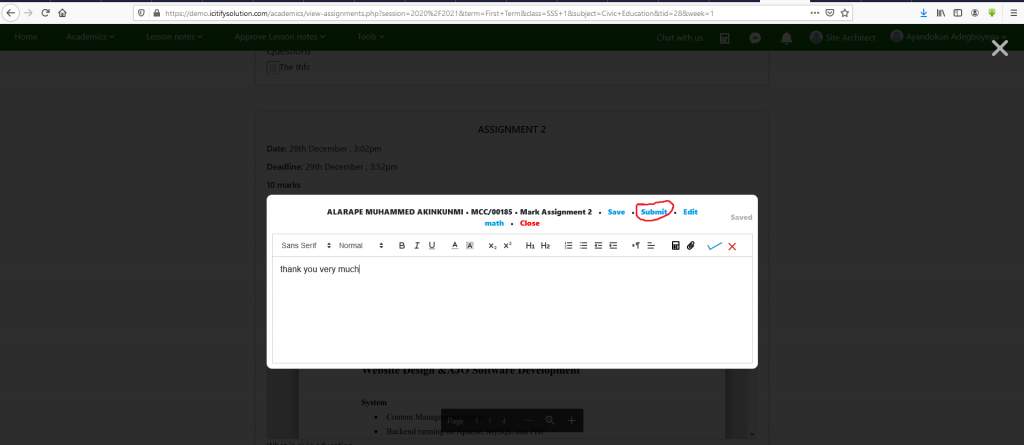
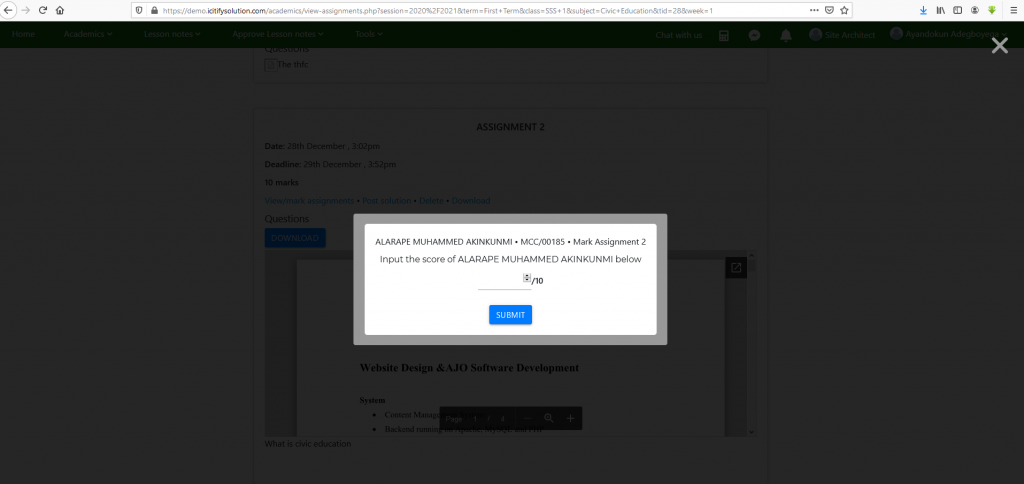
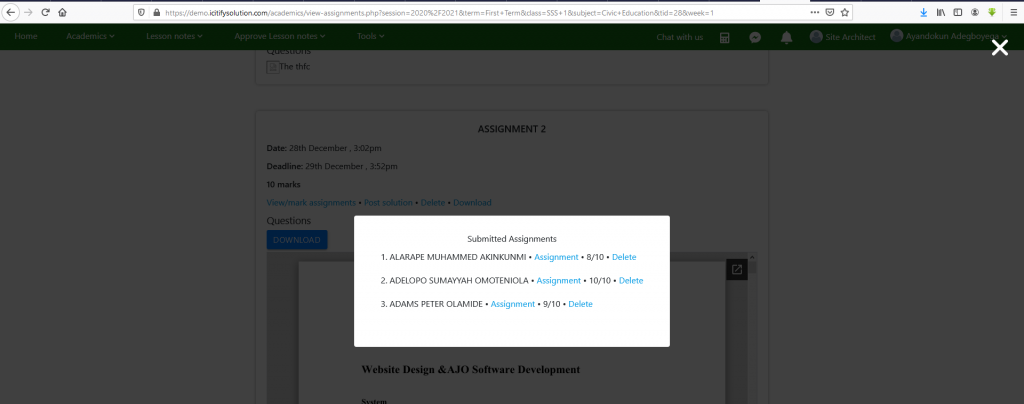
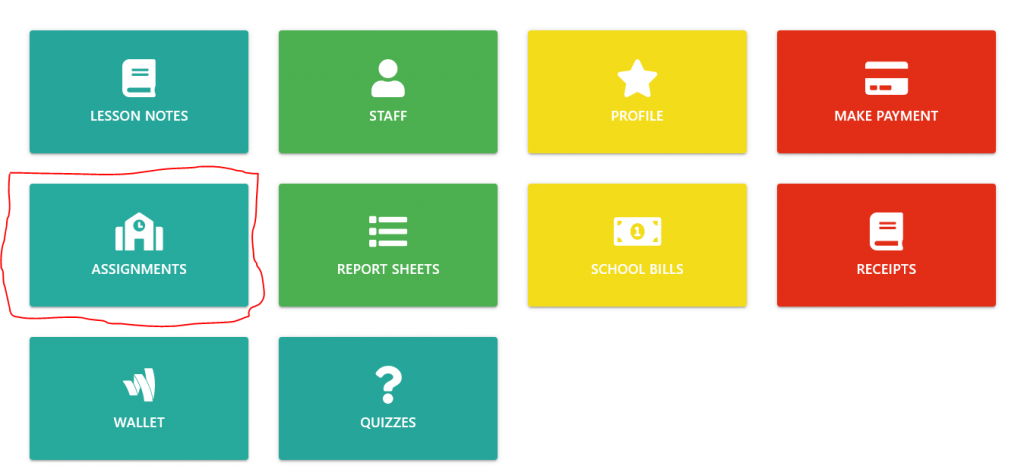
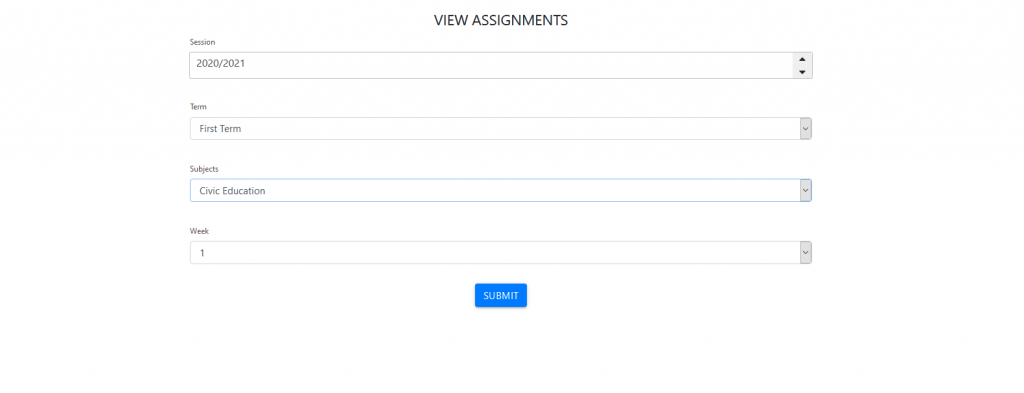
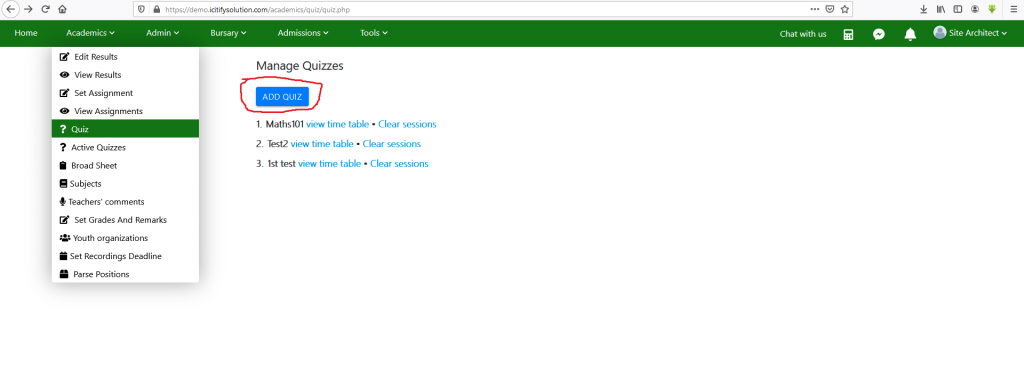
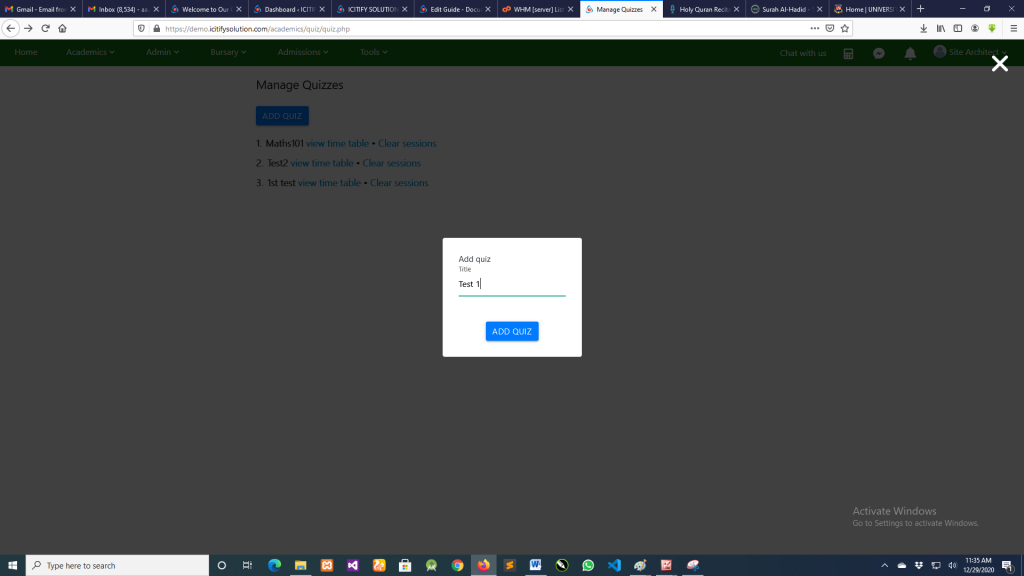
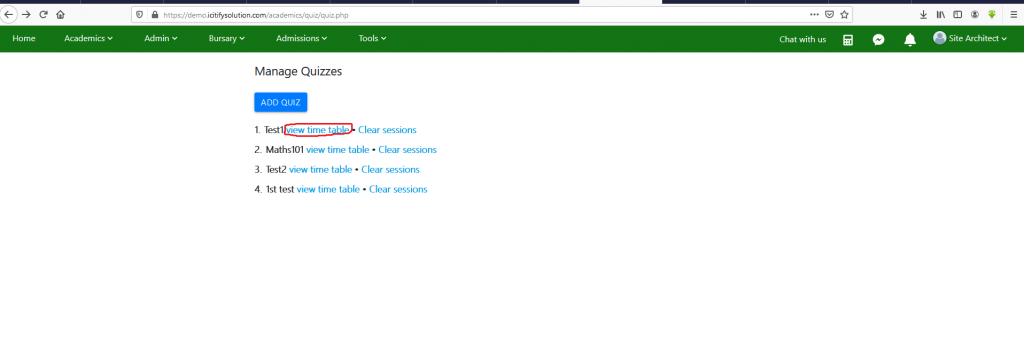
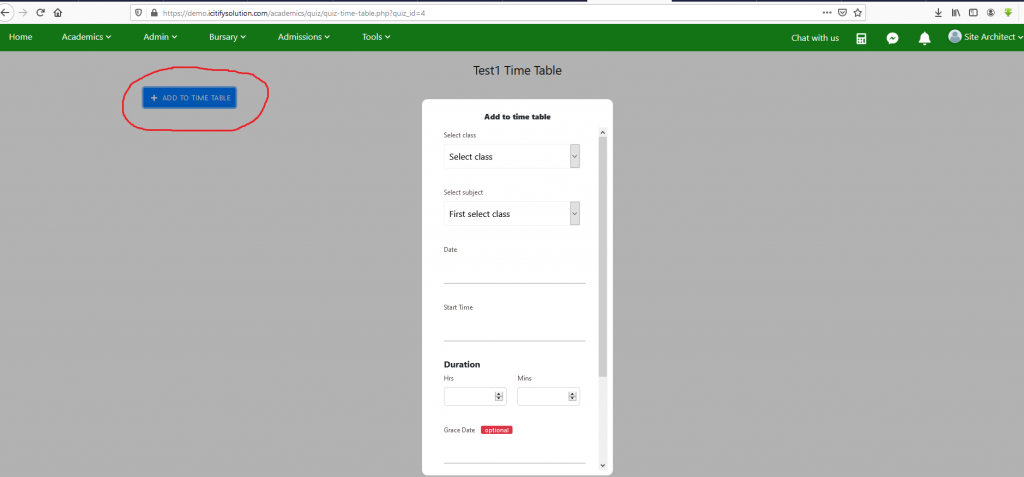
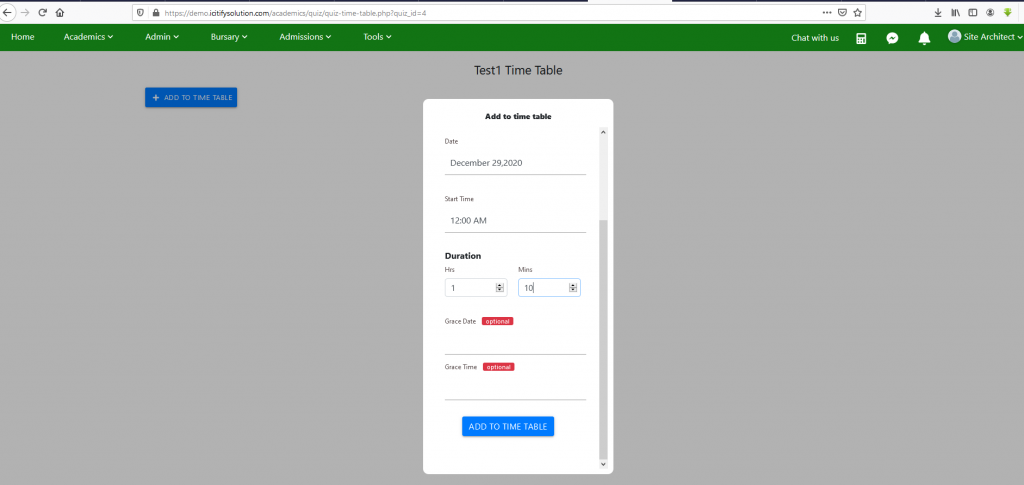
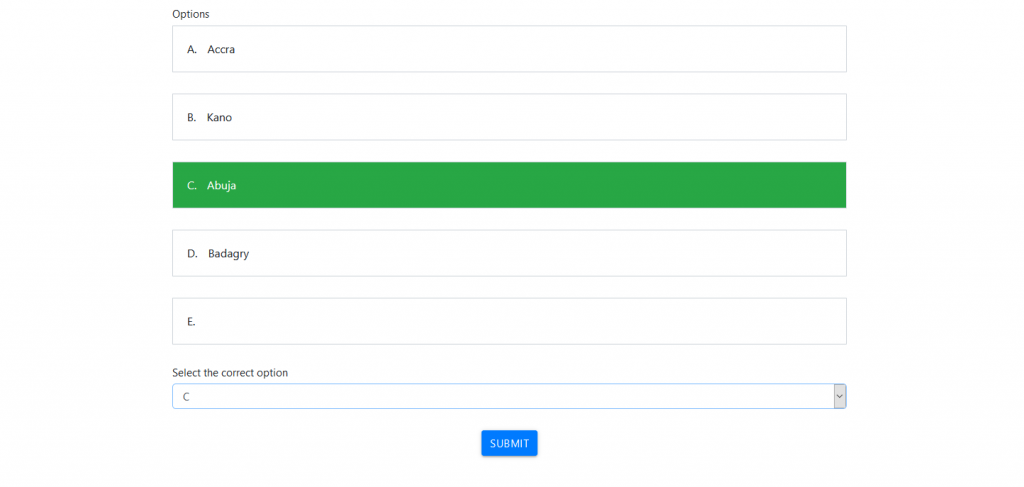
To set up Icitify_SMS, the school need a domain and the SMS shall be set up as a sub-domain of the school’s domain. If the school do not have a website we can help to build one and also register a domain for a school without domain. you can request for the SMS with this link Click here After effective setting up of the solution for your school, users have privileges based on the roles assign to them on the SMS. The following are the types of roles on the SMS. Addition of subjects being offered in the school is the starting point of the SMS after the portal is up and running. Subjects can be added in groups e.g prevocational (Basic science and technology, Biology etc), Religion and Values (IRK,CRS etc) or it can be added as a single subject e.g physics, mathematics, English Language etc). By default during integration, students would have been added to their various classes, However admin can add new student by clicking the Register new student link under the admin dashboard. Admin can change the status of students in the school to either active, withdrawn or expelled. The admin can view the list of students in the school with the admission number which is auto-generated. Click on List of students link under the admin dashboard. The admin would have to add each teacher in the school and add the roles given to each of them. Teachers can be a subject teacher, class teacher or both subject and class teacher. each teacher is added with specific roles. A new teacher is added by clicking the Register a new teacher link under the admin menu. . The admin view the list of registered teachers on the SMS by clicking the Teachers profile link under the admin dashboard. The admin can add different stakeholders and assign appropriate roles to them. E.g Principal, Controller etc. The stakeholders added can also access the portal with a username and password but are restricted to the roles assigned to them. The admin can do this by clicking the Register a new community member link under the admin dashboard. Just like it is done in a normal school system, there must be a lesson note supervisor that supervises the lesson note of all or specific number of subjects. The admin would assign a supervisor for each subject and class. This is done by clicking the Lesson note supervisor link under the admin dashboard. This is a module built to facilitate communication within the portal.The admin can send messages to different users of the SMS. The message could be to all students, a student , all staff or a particular staff. To do this, admin shall click the Send Bulk notifications link in the admin dashboard. The admin can add or remove privileges from users on the SMS. This is done by clicking the Add/Remove Admin Privileges link on the admin dashboard. The name of the user is identifies and right click on the name to view the various privileges. Tick the privileges to assign the user. The admin can remove a student by clicking the Remove student link on the admin dashboard, search for the student and remove the student upon confirmation of the password. However removed students are stored on a separate database which could be retrieved when need be. The admin can remove a teacher by clicking the Remove teacher link on the admin dashboard, search for the student and remove the student upon confirmation of the password. However removed teachers are stored on a separate database which could be retrieved when need be. The admin can help the user to retrieve or reset the password by clicking the View and Reset password link on the admin dashboard, search for the user and confirm the password. The username and password of the user would be displayed and on clicking the reset password, the password is reset to the default which is “password”. The admin have the ability to login to any user’s account with this tool. This is to allow the admin to clone the accounts of others to feel the experience of the users and solve the problems on time.The admin would click the View Account link in the admin dashboard. Settings is what handles all logical flow of the SMS.The admin is expected to fill the major details in the forms which shall be reflected in the operations of the portal. The current session and term are filled, No of days school opened, resumption date are also updated, class arms are listed, name of school, the report sheet settings are also set here etc. Icitify-SMS has a module called the chat module which was develop to facilitate communication within the school. The icon . The bell-like icon The SMS has a built in scientific calculator for users. The icon Only subject teachers can add results of students while class teachers can add comments and other details of the students but not results. on login as subject teacher, list of subjects assigned and the number of students in each class is displayed. when you click the subject you want to input the result, the list of students and the mark obtainable is shown while the teacher input the result of each student. The system immediately sum up the test and exam and give the total, grade and remark. The teacher and the admin can view students results or report cards by clicking on the view Result link under the Academic Menu. Results can be viewed by selecting the session, term and class. Result for individual student can also be viewed by inserting the admission number before clicking the search button. The class teacher is responsible for writing teachers comment in the students’ result. There are preloaded comments from which the class teacher can pick for students, more comments could be added or removed from the pool and comments can be modified by the teacher. Click the + button to add new comment or the x button to remove after password confirmation. The link is Teacher’s Comment under the Academic menu ..See image below Students belong to different voluntary organization within the school such as JETS club, Literary and Debating Society etc and such must reflect in the report sheet. Class teacher need to pick from the list of available youth organization list. The admin can add more or remove from the list.The link is available under the Academic menu. Youth Organization. Each school has a format for the grading and remarks for students.Icitify-sms provide an avenue for each school to set her grades and remarks for the school. it could be set for both the junior school (Nursery to Js3) and for the senior school (SS1-3). The link is under the Academics menu Set Grade and Remarks. The admin is able to set recording deadline so that teacher can input result and comments before the set deadline. This is done by using the Set Recordings Deadline link under the Academics menu. The specific date and time is specified. By default the class position is calculated automatically and very accurate. However when the teachers make new update to various students records, there is need for recalculation. The parse position link available under the academics menu is used. This tool recalculate the position of all students in the school. ICITIFY-SMS has a module for generating the school’s broad sheet. Broad sheet is a summary of the results of students for each term.These results are generated electronically and kept in the database for schools to download when needed. The teachers can set assignment for their students at any time. The Set Assignment link under the Academics menu is used for this purpose. The teacher selects the subject ,week , mark obtainable, deadline date and time. Thereafter the questions are either typed in the editor or are attached for the students. To attach click on the pin-like icon The assignment can be typed in or attached The first step in attempting the assignment by student is to login to the SMS or portal using the username and password given by the school. The next step is to click the notification bell to view the activities, then click the assignment to attempt. attempt by either typing your answers in the editor or you can attach your assignment. Please check how to set assignment to handle attachment. To mark assignment submitted, the teacher login to the SMS or the portal and click the notification bell. The teacher then click on any of the submitted assignment. Click on the view/mark assignment to view the assignment and click the mark link to mark the assignment. Submit the marked assignment and give the score of the student. Repeat the process for the other students and log out when finished. see the images below For students to view the assignment score, they will have to login to the portal, thereafter click the notification bell to select the assignment mark notification message or they can click on the assignment icon in the student dashboard, select week and subject before pressing the submit button. The result of the assignment is shown while the correction can be viewed by clicking on the view correction link beside the score. The corrections can also be downloaded.see images below The SMS has an inbuilt computer based testing module which is called Quiz. The school can use it to conduct a CBT examination for the school and individual teachers can also use it for tests and exams. The module is available via the Quiz link under Academics menu. The admin prepare the time-table while individual teachers set questions in the question bank.The examination date,time and the duration are specified. An optional grace period is also available for examination or test that could be done with a period of time. That period of time is called the grace period which when specified, the test will be available for students within the range of the grace period. After the admin had set up the quiz or CBT timetable, each teacher can proceed to setting questions into the question bank by using the Active Quizzes link under the Academics menu. The teacher click the Manage quizzes in front of the subject, set the instructions and then set the questions. The question is typed and the options given. The correct option is also selected.Icitify-SMS Guide
1.Introduction
2.Setting-up the SMS
3.SMS-ROLES
4.HOW TO ADD SUBJECTS
5.HOW TO ADD STUDENTS
6.HOW TO VIEW LIST OF STUDENTS
7.HOW TO ADD TEACHERS
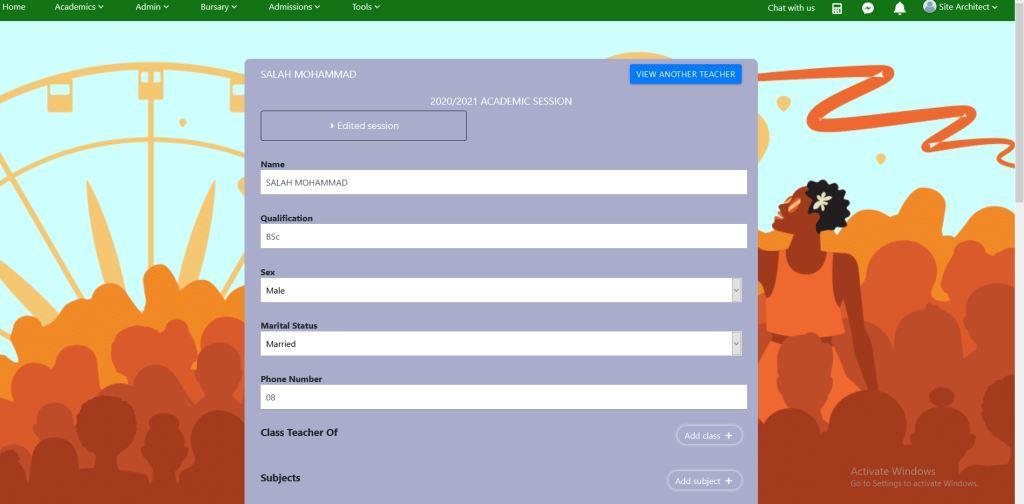
8.HOW TO VIEW LIST OF TEACHERS
9.HOW TO ADD COMMUNITY MEMBERS
10.HOW TO ADD LESSON NOTE SUPERVISORS
11.HOW TO SEND BULK MESSAGES
12.HOW TO ADD/REMOVE PREVILEGES
13.HOW TO REMOVE A STUDENT
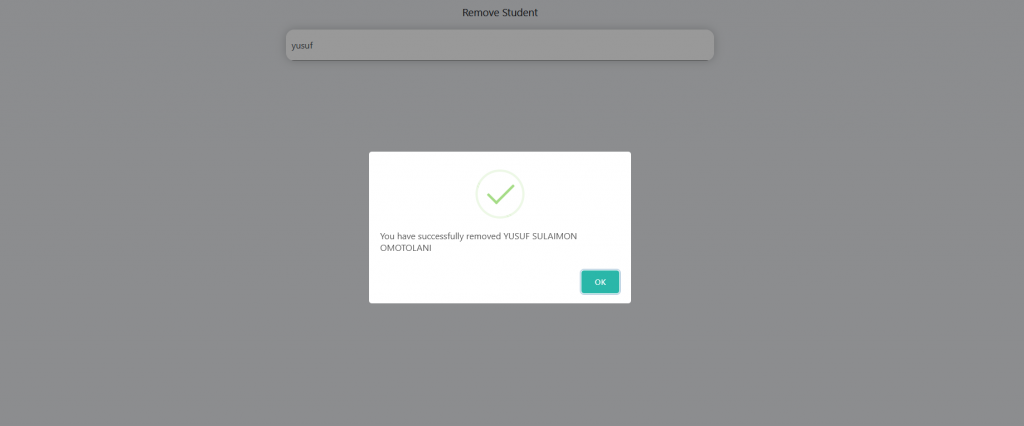
14.HOW TO REMOVE A TEACHER


15.HOW TO VIEW/RESET USER PASSWORD
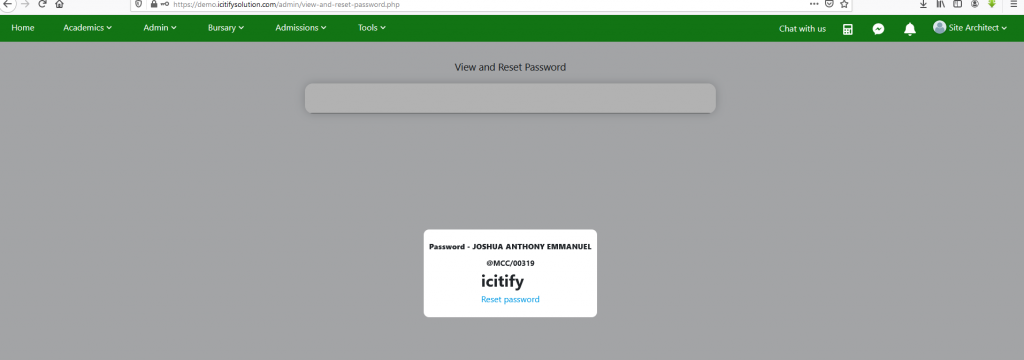
16.HOW TO LOGIN TO ANOTHER ACCOUNT
17.HOW TO ADJUST SETTINGS ON THE SMS

18.HOW TO USE CHAT MODULE
![]() represents the chat icon.Teachers can chat with one another and can also chat with their students. Students can also communicate with one another via the module. The module can be customized to suite the regulations of the school e.g student to student communication can be blocked etc.
represents the chat icon.Teachers can chat with one another and can also chat with their students. Students can also communicate with one another via the module. The module can be customized to suite the regulations of the school e.g student to student communication can be blocked etc.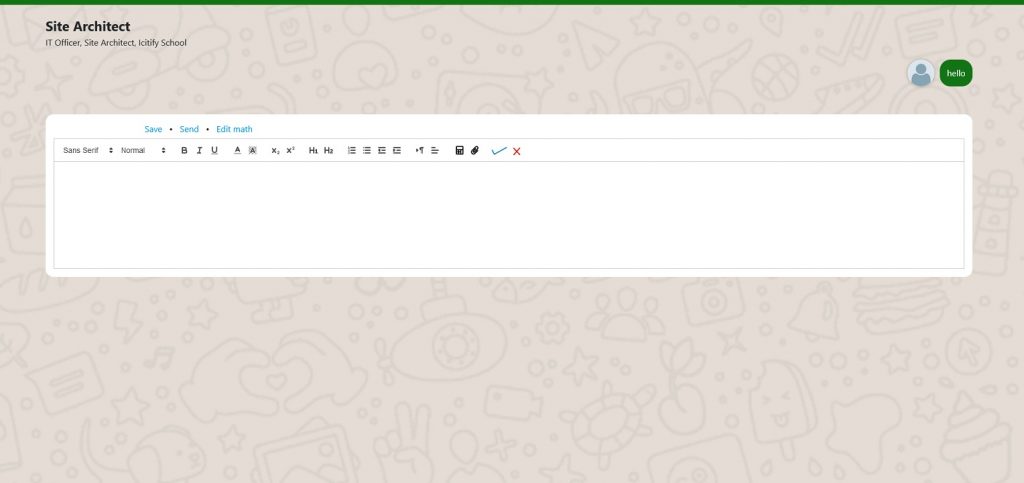
19.HOW TO USE THE NOTIFICATION BELL
![]() is for notification. All activities on the portal is sent as a push notification to the users. Hence it is expected that users first point on login is the notification to view all the summary of the activities on the portal such as assignments, lesson note, chat etc. Below is a sample notification message. Clicking on the message take you directly to the activity.
is for notification. All activities on the portal is sent as a push notification to the users. Hence it is expected that users first point on login is the notification to view all the summary of the activities on the portal such as assignments, lesson note, chat etc. Below is a sample notification message. Clicking on the message take you directly to the activity.
20.HOW TO USE THE CALCULATOR
![]() is the calculator icon which on click pop-out the calculator for use. when not needed click the close link to hide the calculator.
is the calculator icon which on click pop-out the calculator for use. when not needed click the close link to hide the calculator.
21.HOW TO ADD RESULT FOR STUDENTS
22.HOW TO VIEW RESULTS

23.HOW TO ADD/REMOVE TEACHER'S COMMENT
24.HOW TO ADD YOUTH ORGANISATION
25.HOW TO ADD GRADES AND REMARKS TO THE REPORT SHEETS
26.HOW TO SET RECORDING DEADLINE


27.HOW TO CALCULATE THE CLASS POSITION
28.HOW TO GENERATE BROADSHEET
29.HOW TO SET ASSIGNMENT FOR STUDENTS
![]() on the editor and select what to attach.
on the editor and select what to attach.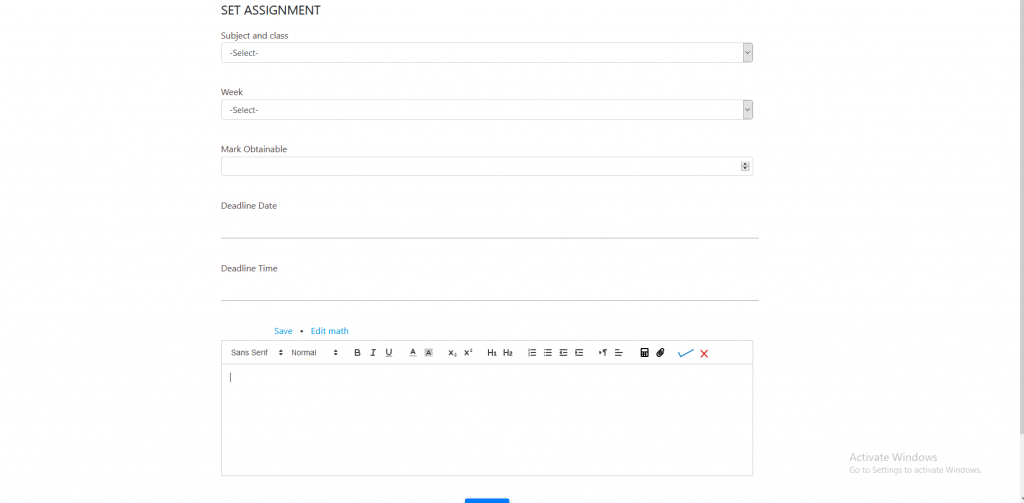
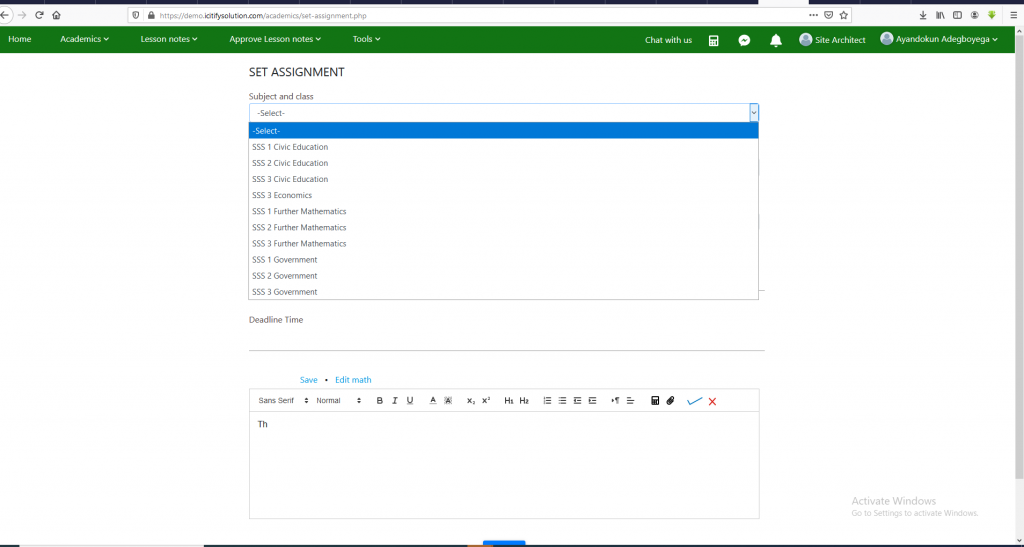
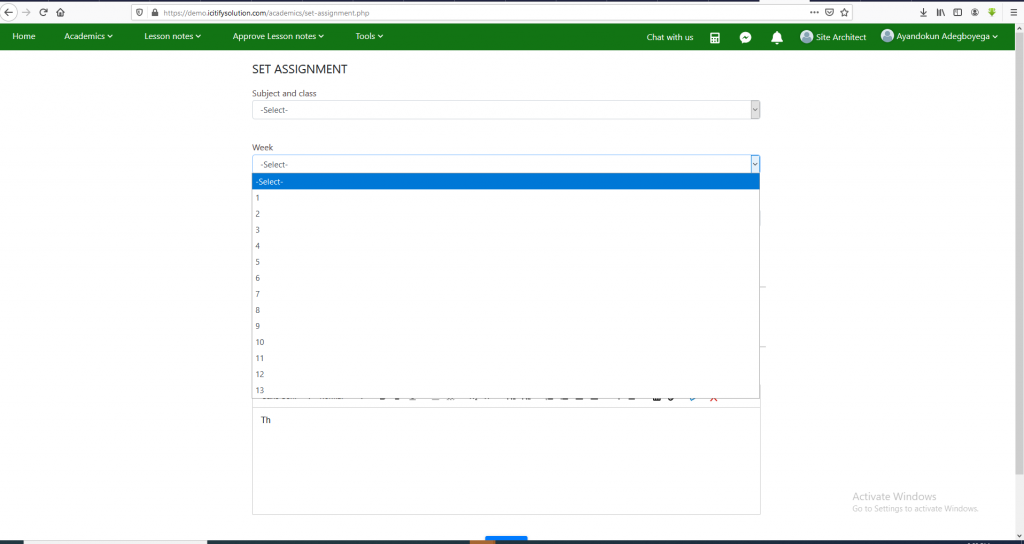
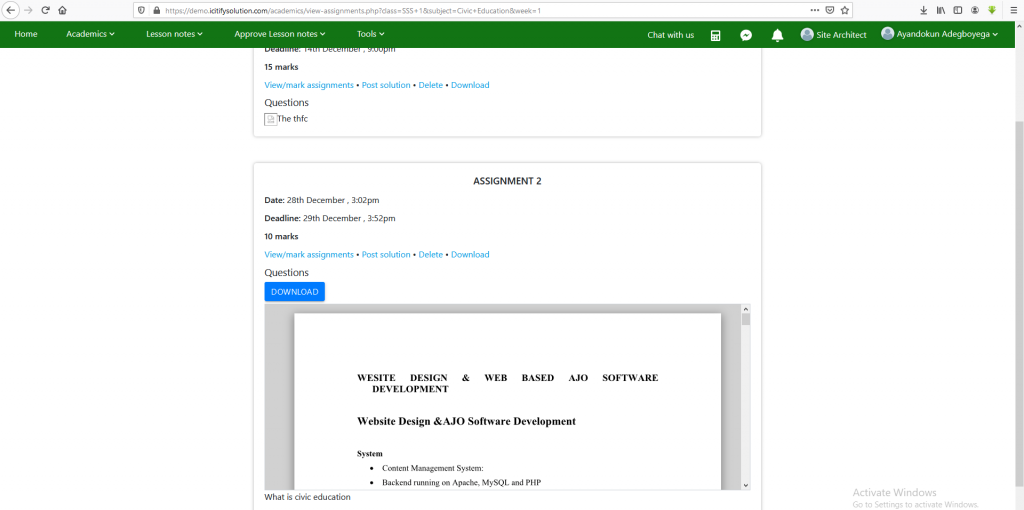
30.HOW TO ATTEMPT ASSIGNMENT BY STUDENTS
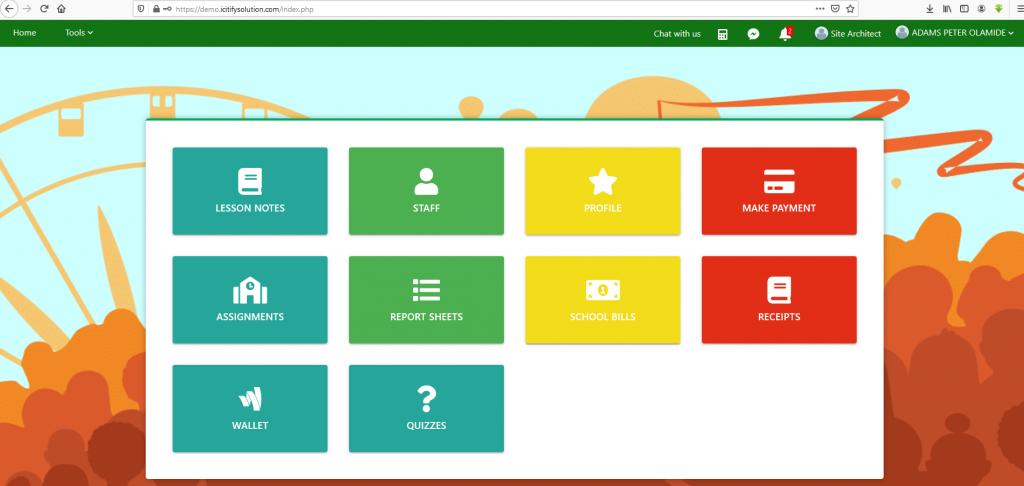

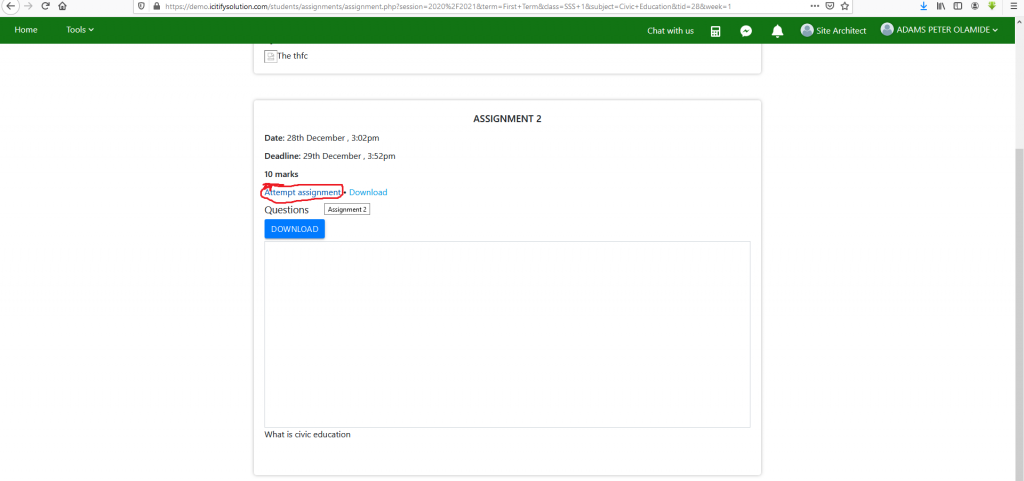
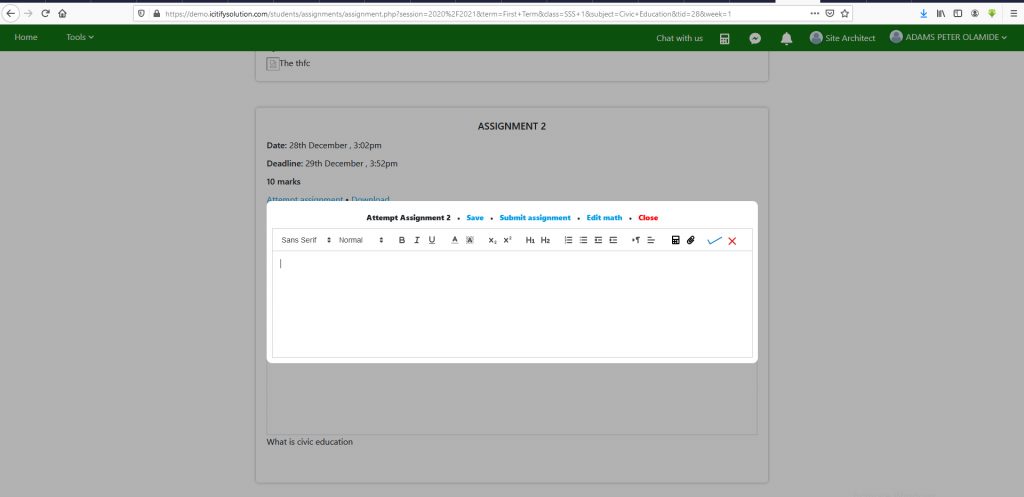
31.HOW TO MARK ASSIGNMENT
32.HOW TO VIEW ASSIGNMENT SCORE AND CORRECTION BY STUDENTS


33.HOW TO USE QUIZ OR CBT MODULE

34.HOW TO SET ACTIVE QUIZZES BY TEACHERS


Welcome to Our Guide
Icitify-School Management Solution revered to as Icitify-SMS is a software solution developed for primary and post-primary (secondary) schools in Nigeria. The solution is to simplify and automate the entire school management process. it handles Academics including E-learning, Accounts all forms of payment and receipt generation with comprehensive reports , it also automates the result process of the school. The process of handling the software shall be explain in details. We implore schools to grab this opportunity and benefit from the solution.

